
Want to skip the boxy shoulders, awkward sleeve lengths, or generic prints of store-bought shirts?
Or maybe you're tired of shirts that just don't fit your body or your style perfectly?
Well… learning how to sew your own shirts will do away with these problems for good.
However, the idea of sewing your own shirts might seem daunting at first. Not only do you need to know the basics of sewing, but you also have to learn how to sew necklines, hems, and, of course, sleeves.
That's why we put together this simple guide.
All you need to do is follow the steps carefully, and you'll find that sewing your own shirt isn't that hard after all.
How to Sew a Shirt in 5 Steps
Step 1. Choosing a Simple Pattern
You can choose any shirt pattern that you want. However, for beginners, it's best to stick with relatively simple patterns with few details.
Sewing even the most basic shirt already comes with several challenges for beginners, such as sewing sleeves, hemming the neckline, or adding buttons. That's why you wouldn't want to be bogged down by even more details.
Once you've mastered simple shirts, you can move on to more fancy designs.
Some simple patterns we recommend for beginners include the following:
Step 2. Gathering Materials
Once you've chosen your pattern, you'll want to gather the materials needed to turn that pattern into a beautiful reality.
Fabric Selection
If your chosen pattern calls for a certain type of fabric, then go for it.
However, if you're unsure which fabric to use, we usually recommend fabrics that are easy to handle, don't stretch or slip while sewing, are easy to tell the right and wrong sides apart, and, of course, look great.
We also recommend beginners stay away from patterns that call for silk (slippery), chiffon (very lightweight), or heavy denim (thick and hard).
Instead, some of our top recommendations include:
- Cotton - Our #1 recommendation for beginners. This is arguably the easiest material to sew with, ticking all the boxes of what makes a fabric beginner-friendly.
- Linen-Blends - Lightweight linens can be tricky for beginners to sew with, which is why we recommend linen-blends instead. It's cooler than cotton, and also gives shirts a wavier look.
- Chambray - Chambray is a cotton plain-weave fabric that looks similar to denim. Denim can be too hard and stiff for beginners to work with, so if you'd like a similar style that's easy to sew, go for chambray instead.
- Poplin - If you want a classier look on your shirt, you can use poplin. Poplin is another plain weave fabric that's simple for beginners to sew, and is a great alternative for people who want a more "formal" look on their shirts.
Essential Tools
Finally, here's a few tools you'll want to prepare:

Step 3: Preparation
The next step is to take your measurements, adjust your pattern as needed, and cut your fabric for sewing.
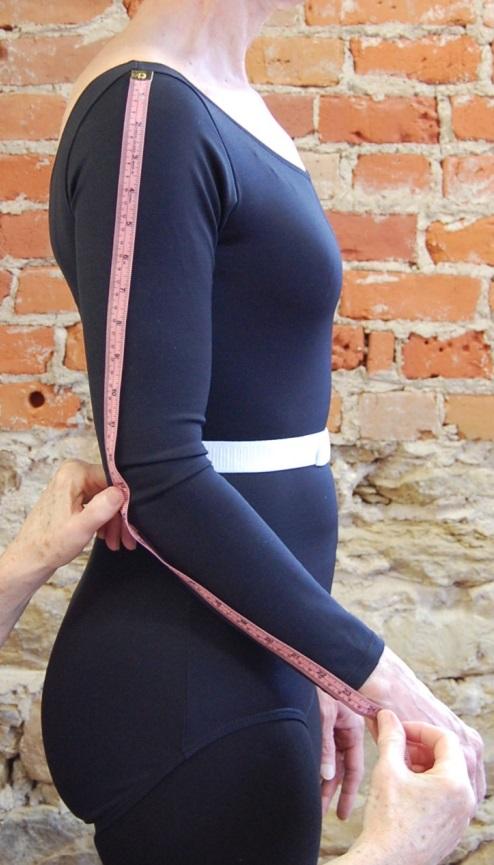
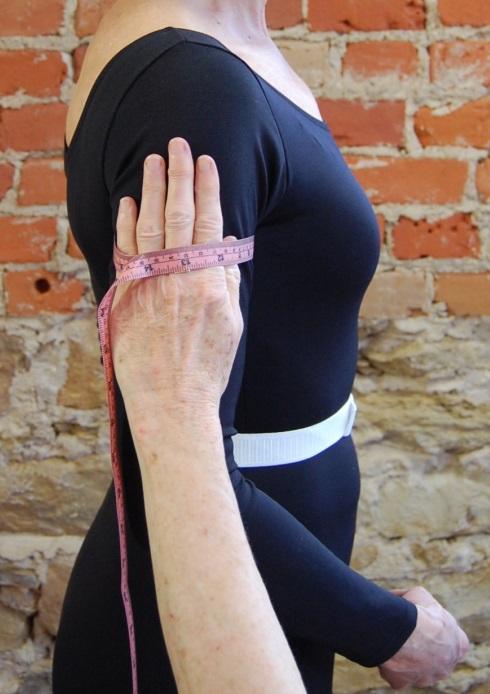
Taking Accurate Measurements for a Shirt
For shirts, you'll want to measure your:
- Waist
- Full Bust
- Shoulder Width
- Back Length
- Sleeve length
- Upper arm circumference
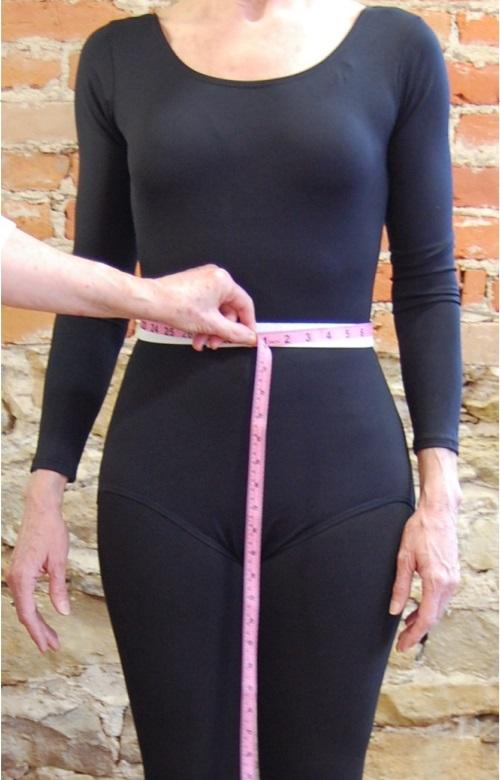
Before you begin, wrap an elastic band around the smallest part of your waist.
Waist - Wrap your measuring tape around the elastic band on your waist, keeping the measuring tape parallel to the floor.
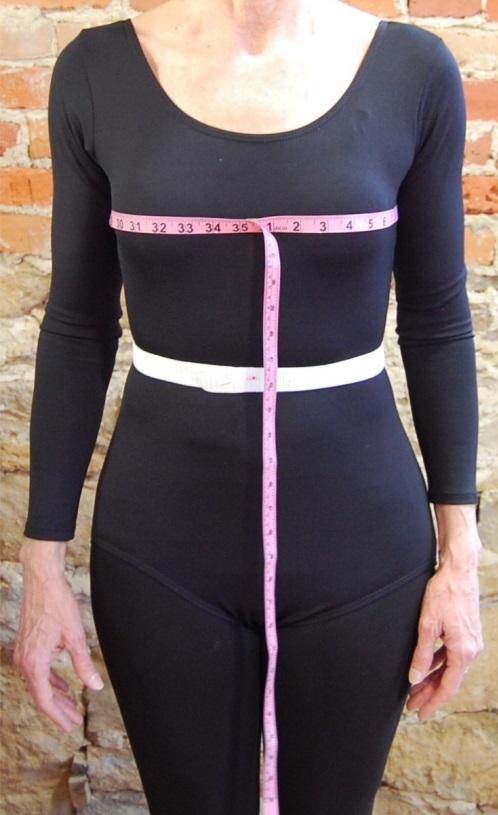
Full Bust - With your measuring tape parallel to the floor, measure the fullest part of your bust.
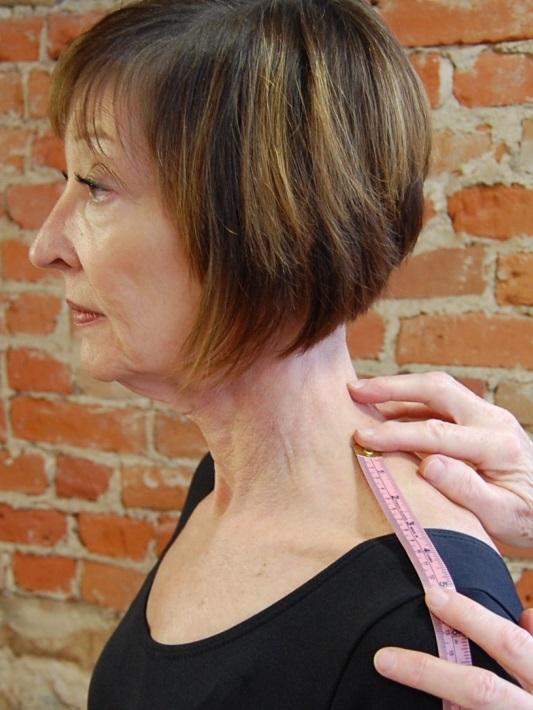
Shoulder Length - Measure from the base of your neck to your shoulder joint.
To locate the base of your neck, try putting on a lightweight chain necklace — it will naturally rest at the base. Alternatively, tilt your head toward one shoulder to find the crease where your neck bends.
To find your shoulder joint, raise your arm and feel for the dip or socket where your arm connects to your shoulder.
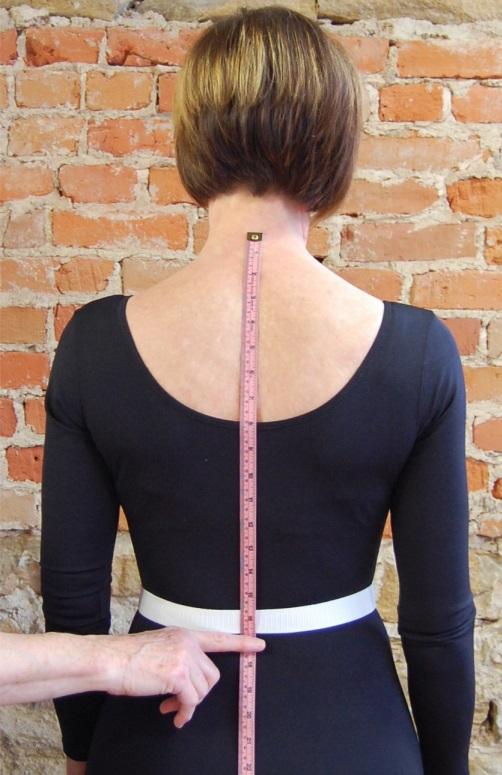
Back Length - Measure from the prominent bone behind your neck all the way down to the lower part of the elastic band around your waist.
Sleeve Length - You can decide however long or short you want your sleeve length to be. To get an accurate measurement, start from the shoulder joint down to the point you want your sleeves to reach.
Armhole Circumference - Place your hand on your bicep and wrap your measuring tape around both. This is so that your sleeves won't be too tight in your finished piece. You can also just measure the widest part of your bicep and add 1-2" of ease.
Adjusting Your Pattern
Now that you have your measurements, you'll want to adjust your pattern to fit your size.
Compare your measurements to your pattern, take some tracing paper, and then re-draw your pattern using your measurements.
You'll also want to leave a few inches of ease so your shirt won't be too tight. Here's how many inches of ease you'll want to add to the pattern:

Finally, give yourself a few inches of seam allowance. ⅝" is the standard seam allowance.
Cutting the Fabric
Next, lay your newly fitted pattern pieces down on your fabric. Then take your chalk (or whatever fabric marker you have) and trace the patterns into your fabric. If your pattern doesn't have seam allowances yet, be sure to add ⅝".
Take your fabric scissors or cutter, and cut the fabric in long, smooth cuts. You'll want to do this carefully, since uneven cuts can give your clothes an unprofessional finish.
Most patterns will leave you with a front piece, a back piece, and 2-4 pieces for sleeves.
Step 4: Sew Your Shirt
You can divide sewing a shirt into four steps:
- Sewing the side seams
- Sewing the neckline
- Sewing the sleeves, and
- Hemming the bottom
Sewing the Side Seams
The first step is always to sew the side seams.
To do this, place your front and back piece together with the right sides facing each other (and wrong sides facing out). Use pins to hold these pieces together as you sew.
Start from the bottom of the shirt and make your way up to the arm holes. Start with a back stitch to prevent unraveling, continue with a straight stitch, and end with a backstitch again.
Then sew the side seams from the top of the armhole to the neckline.
Do this for both sides.
Sewing the Neckline
There are many ways to sew a neckline. Some patterns have a neck piece that you sew in, but probably the easiest way to do this is by using bias tape. Here's how:
- Finish the raw edges by using a zigzag stitch
- Staystitch around the neckline to prevent stretching or distortion
- With the wrong side of the fabric facing out, align the bias tape along the edge of the neckline
- Sew the bias tape to the neckline, about ¼ inch from the edge, gently stretching the tape as you sew
- Use an iron to press the bias tape toward the seam for a smooth finish
- Fold the bias tape over twice to enclose the raw edge
- Pin or clip the folded bias binding in place securely
- Sew along the inner edge of the folded bias tape to finish the neckline neatly
You can also see different ways to finish the neckline in this video:
Sewing the Sleeves
Sewing sleeves can be very tricky for beginners, so take extra care while following these steps.
If your pattern has four sleeve pieces, you'll first want to sew the right front with the right back (and left front with left back):
- Align the front and back pieces for each sleeve and sew them together to form the left and right sleeves
- Sew with the wrong side of the fabric facing out so the seams are hidden inside the finished sleeve
- Finish the raw edges of both the sleeves and the armholes of the dress using a zigzag stitch or a serger
Once your sleeve pieces are ready, you'll want to attach them to your shirt:
- Insert the sleeve into the armhole of the shirt, placing the sleeve seam underneath the main shirt fabric
- Don't worry if the sleeve is slightly wider than the armhole — this is common in many patterns
- Match the bottom edge of the sleeve to the bottom of the armhole, and hold it in place
- Flip the shirt so the wrong side is facing out, exposing the inside seams
- Pin the sleeve in place, starting at the bottom and working your way around the armhole
- Optional: Baste stitch around the sleeve to keep it from shifting while sewing
If you follow the steps above carefully, you should have clean sleeves on your shirt. However, if you want to learn more and give your sleeves a super professional finish, then check out our Anatomy of a Sleeve lesson here.
Hemming the Bottom
There are many ways to hem the bottom of your shirt. One of the simplest ways to do this is by sewing a double-folded hem. Here's how:
- Fold the raw edge up once (about ¼" - ½")
- Pressing it with your iron
- Fold one more time
- Stitch the hem closed to the inner folded edge
Step 5: Add Details
If you'd like to add a few details to your shirt, pockets and buttons are great additions for beginners to add.
Pockets
- Create pattern on paper - The simplest pockets are square shaped. However, you can play around with any shape you like.
- Check size and placement on shirt - Place your pattern on your shirt and adjust the size and position as you like. Once you're happy, mark the part on your shirt where you'll add the pocket
- Cut fabric - add ¾" seam allowance to the top-side of your pocket, and ½" to all the sides and bottom
- Hem the top - Add a simple hem to the top side of the pocket, where the opening will be. You can do this by folding ¼" twice, and sewing the fold down.
- Fold the sides - Fold the sides and bottom ¼" once, and sew those as well.
- Sew pocket into shirt - Place the pocket on your shirt, pin it in place, then sew the sides and the bottom. Make sure to place an insert inside the shirt (such as a tailor's ham, or a piece of cardboard) while doing this, so you don't sew the front and back of your shirt together.
Buttons
Note: buttons are not something you just add to a finished shirt, because your pattern will look different if it calls for buttons. That said, here's how to add buttons:
- Mark your fabric where the buttons are going
- Thread your needle
- Hold the button firmly in place with your weaker hand, then sew through the button holes with your stronger hand
- If your button has four holes, sew diagonally (in an X shape) 2-3 times
- If your button has two holes, sew through the holes 3-4 times
- With the needle at the back of the button, make a few small stitches, and knot the thread to prevent unraveling
Best Shirts to Sew for Beginners

One of the easiest shirts you can sew is the Eureka Top.
Sewing this shirt will help you with the fundamentals of sewing a shirt. There are no fancy details that you have to worry about, and the neckline also uses bias tape — which is one of the easiest ways to finish the neckline.
If you want to practice adding pockets, you can also do so with the Eureka Top.
Overall, the Eureka Top is a super simple and easy-to-sew shirt that's perfect for first-time sewists.
If you're looking for a pattern with a bit more detail, you can go for the London Shirt.
The London Shirt is a loose-fitting top with a side-vents, diagonal-to-the-top seams, and a collar. It also has buttons, making it more challenging to sew than the Eureka Top, but still something a beginner can handle.
Sewing this piece will teach you how to work with details that you see in a lot of other tops.
If you're up for it, you can get the pattern here.

If you want to try your hand on a more detailed shirt, you can go for the Liberty Shirt.
This pattern is more challenging for beginners than the first two. However, if you're patient and follow the pattern carefully, you'll find that you're able to create fancy shirts just like this.
The Liberty Shirt is similar to the London in many ways, however, this shirt has a longer back piece, which gives it that assymetric look.
If you're up for the challenge, grab the pattern here.
Troubleshooting Common Issues
Here are some of the most common problems beginners run into while sewing shirts and how to fix them:
- Puckering Seams - If you find that fabric gathers or looks wrinkled along the seams, use your seam ripper to open the seams and sew again. This usually happens if you're pulling the fabric while sewing. Instead, let the sewing machine do the work for you
- Misaligned Buttonholes - Measure twice, cut once. You'll want to be extra careful while marking where the buttons should go. If you find that the buttons or buttonholes sag and get misaligned, then use interfacing to strengthen the fabric and make it hold up better
- Sleeves Are too Big - Sleeve pieces should be slightly bigger than the armhole. However, if your sleeves are too big that it causes bunching, you can ease the extra fabric in evenly around the armhole. Use pins and basting stitches to avoid crowding in one area.
Wear Your Creation Proudly!
Shirts are definitely more challenging to sew than skirts, bags, or even pants, so give yourself a pat on the back, and wear your creation proudly.
But don't stop there.
Instead, once you have the fundamentals down, start adding more details, using different fabrics, and trying some of the more complex, but beautiful patterns.
Remember, practice makes perfect.
So grab your first shirt pattern today, and get to sewing!